这系列文章是慕课网《算法与数据结构》实战课程老师的讲授内容笔记整理,其中有很多动图都是我参考老师的动画演示自己制作的,并提供 JS(es6) 版的代码示例。代码仓库:📦 https://github.com/Mitscherlich/Play-with-Algorithms-JS
在上一节中我们实现了最大堆这个类以及它的两个重要操作,在这一节中,我们将具体学习如何使用堆这个数据结构完成我们的排序操作,并提供一个优化实现形式 —— 索引堆。

成堆 Heapify
对于一个给定的数组,我们不一定实现堆这个类,而是通过成堆 (Heapify) 这样的操作来使得数组具有堆的性质。
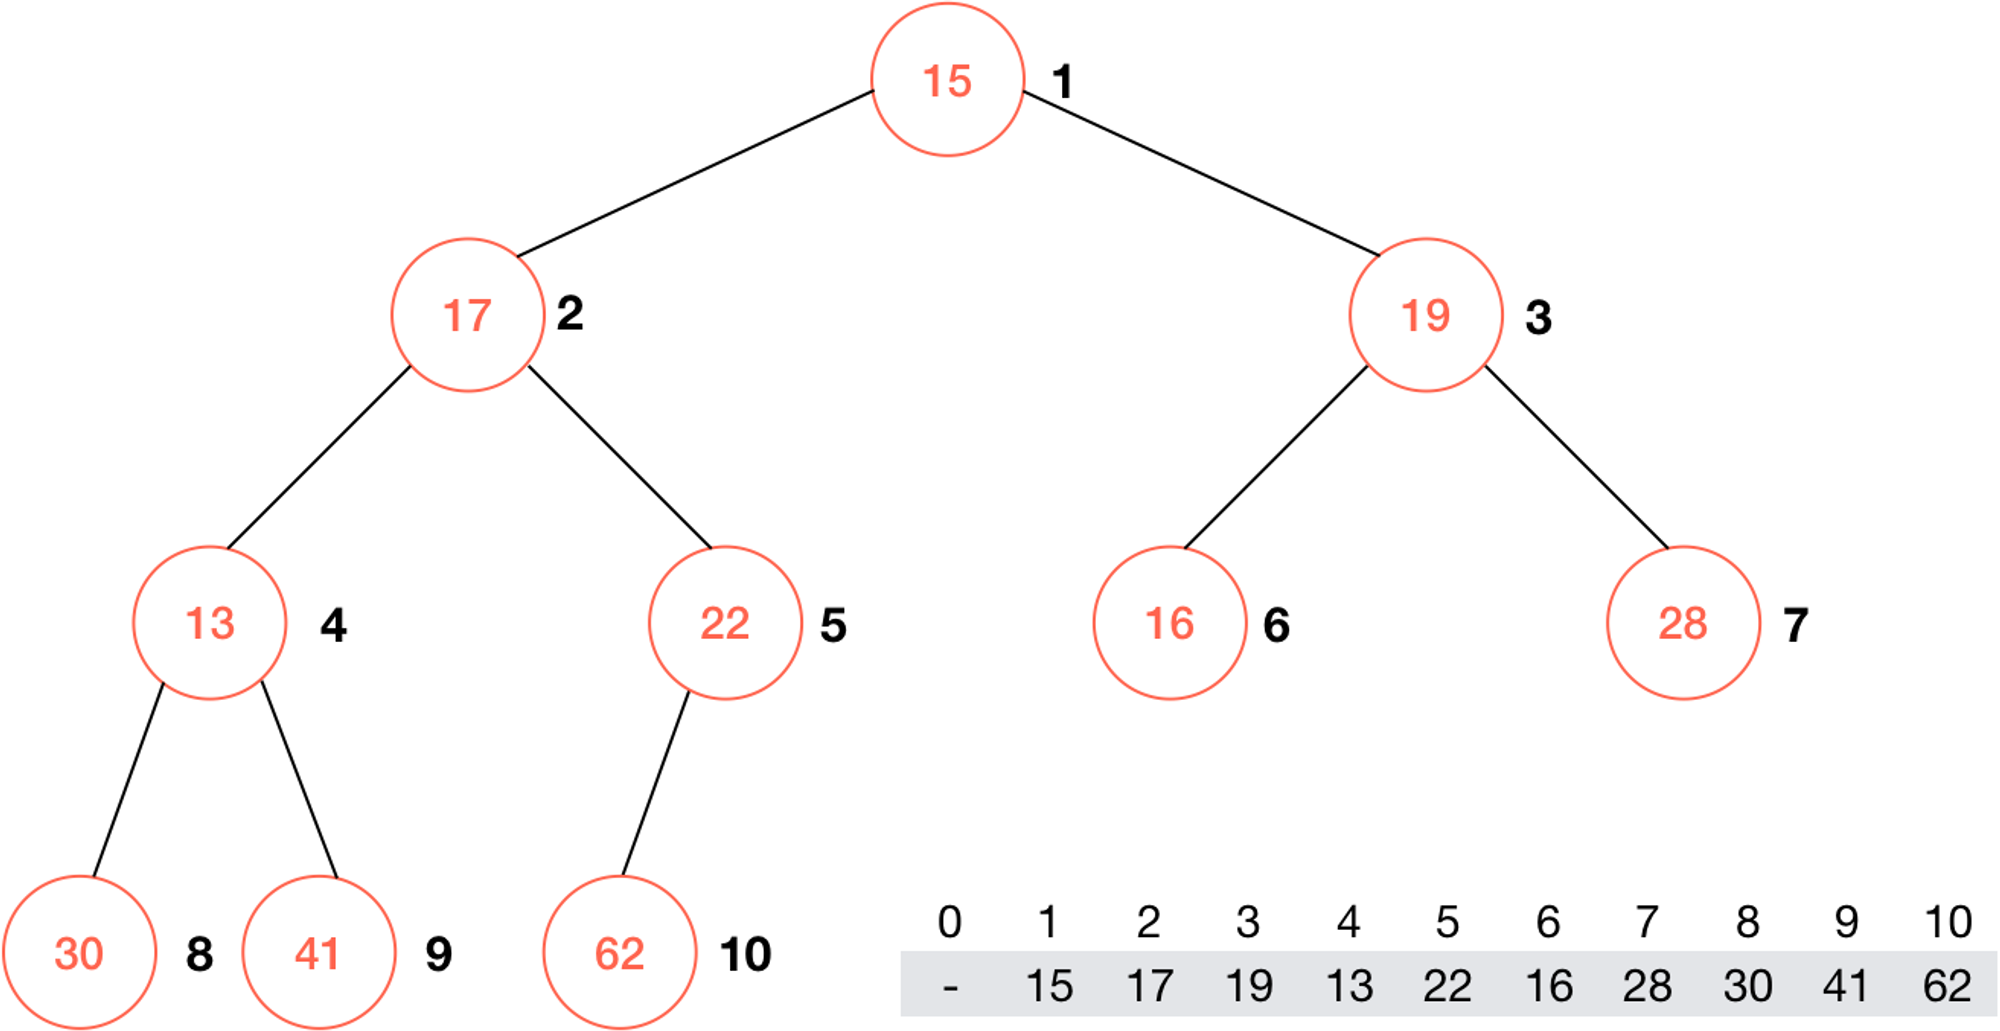
如图所示,要使得这个数组所对应的完全二叉树形成一个最大堆,只需要使得每一棵子树都形成最大堆即可。那么不难看出,所有的叶子结点都可以看作是一个仅有一个元素的最大堆,所以我们只需要从最后一个非叶子结点开始,通过前一节的
shiftDown 操作,就可以很容易的构建出最大堆来。一个显而易见的数学关系是: 完全二叉树最后一个非叶子节点的索引是 ,例如这里有 10 个元素,那么最后一个非叶子结点的索引就是 5;类似的,如果有 11 个元素,那么同样 5 是最后一个非叶子结点的索引;不过要注意的是,这里的索引是从 1 开始的,如果是从 0 开始的索引只需使 i-1 () 即可。这很容易就能用数学归纳法证明。
简单来说,
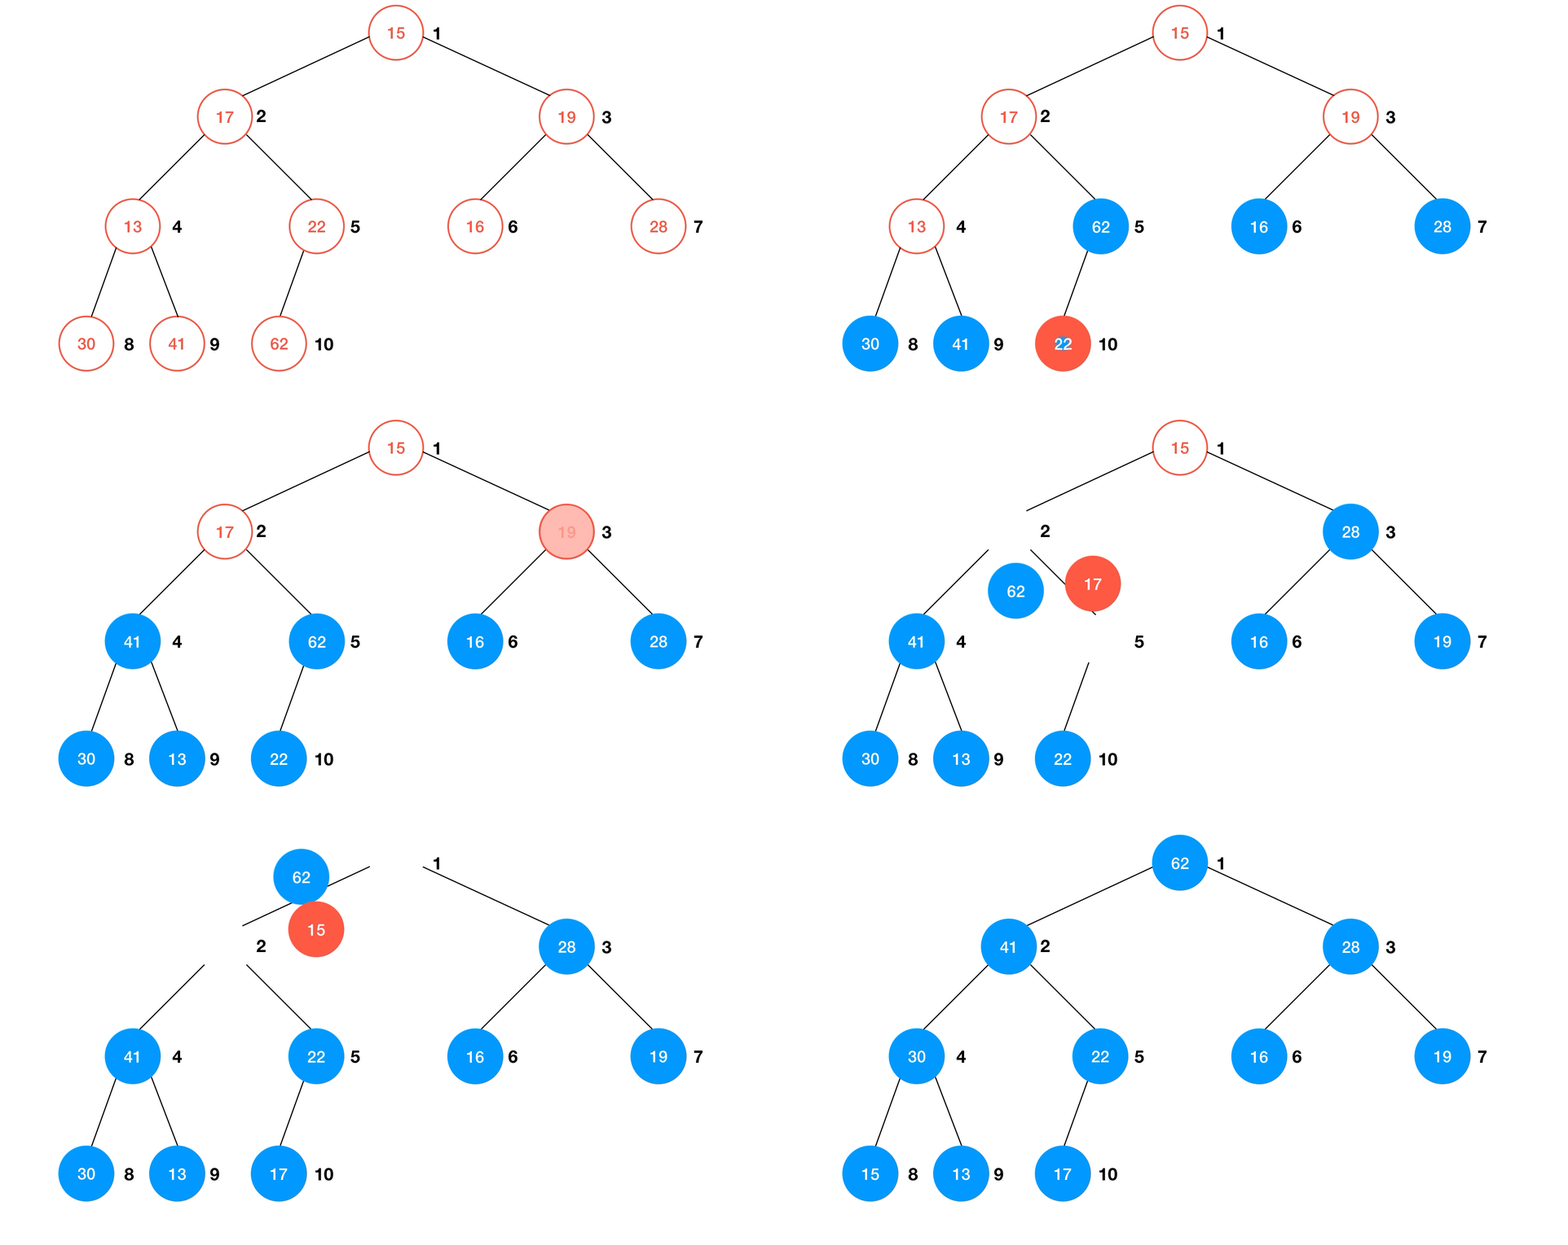
Heapify 的算法过程可以简述为:- 从最后一个非叶子结点开始向前遍历数组;
- 每遇到一个非叶子结点,就通过
shiftDown使以当前节点为根结点的子树成最大堆;
- 重复直到根节点完成
shiftDown。
动画演示:
class MaxHeap {
  // 新的构造函数,传入一个数组使其成最大堆
  constructor (array) {
    const n = array.length
    this.#data = new Array(n + 1)
    this.#capacity = n
    for (let i = 0; i < n; i++) {
      this.#data[i + 1] = array[i]
    }
    this.#count = n
    for (let i = Math.floor(n / 2); i >= 1; i--) {
      shiftDownEnhance(this.#data, i, n)  // 见【慕课】重学算法 - part.3 堆排序 (1)
    }
  }
  ...
}通过堆进行排序
通过新的构造函数,我们可以方便的将一个数组构造为最大堆,显而易见的,我们将数组放入再取出最大堆的过程,其实就完成了一次排序。我们可以这样实现:
/**
 * generateRandomArray
 * @see https://github.com/Mitscherlich/Play-with-Algorithms-JS/blob/master/test/utils/index.js#L8
 */
const sorted = []
const array = Array.generateRandomArray(50, 0, 100)
const maxHeap = new MaxHeap(array.slice())
while (!maxHeap.isEmpty()) {
  sorted.unshift(maxHeap.extractMax())
}
console.log(JSON.stringify(sorted))
值得注意的是,这种通过
Heapify 来成堆的操作并进行堆排序速度由于上一节我们一个一个将元素插入进堆的操作,事实上,这两种操作的算法复杂度的确有所不同的:- 将
n个元素注意插入空堆中:
Heapfiy:
由于堆算法复杂度的证明不是本系列的重点并且有点难,感兴趣的同学可以自己来进行详细地推导证明,这里并不展开。
数组的原地堆排序
无论是将元素逐一插入空堆还是通过
Heapify 来使数组成堆,我们实际上都开辟了一个堆的空间 (也就是使用了额外的 的空间复杂度)。但结合上面 Heapify 的思想,我们也可以很容易的改造堆排序的过程,使数组原地完成堆排序的操作。
我们假定通过
Heapify 已经使一个数组形成最大堆,这时数组中第一个元素也就是最大的元素,要是数组从小到大排序,只需使现在数组第一个位置的元素与最后一个元素交换位置:
而此时由于
w 并不一定是最大元素,也就使得原有最大堆的性质遭到了破坏。这时只需通过对 w 元素进行一次 shiftDown 操作,就能使数组的前部重新形成最大堆:
那么重复上述操作就可以使整个数组完成排序。
const shiftDown = (array, n, k) => {
  while (2 * k + 1 < n) {
    let j = 2 * k + 1
    if (j + 1 < n && array[j + 1] > array[j]) {
      j++
    }
    if (array[k] >= array[j]) {
      break
    }
    // swap(arr[k] , arr[j])
    [array[k], array[j]] = [array[j], array[k]]
    k = j
  }
}

// 不使用一个额外的最大堆, 直接在原数组上进行原地的堆排序
Array.prototype.heapSort = function () {
  const array = this.slice()
  const n = array.length
  // heapify
  // 注意,此时我们的堆是从 0 开始索引的
  // 从(最后一个元素的索引-1)/2 开始
  // 最后一个元素的索引 = n-1
  for (let i = Math.floor((n - 1) / 2); i >= 0; i--) {
    shiftDown(array, n, i)
  }
  for (let i = n - 1; i > 0; i--) {
    // swap(arr[0], arr[i])
    [array[0], array[i]] = [array[i], array[0]]
    shiftDown(array, i, 0)
  }
  return array
}类似的,最后使用一步交换进行优化:
// 优化的 shiftDown 过程, 使用赋值的方式取代不断的 swap,
// 该优化思想和我们之前对插入排序进行优化的思路是一致的
const shiftDownEnhance = (array, n, k) => {
  const e = array[k]
  while (2 * k + 1 < n) {
    let j = 2 * k + 1
    if (j + 1 < n && array[j + 1] > array[j]) {
      j++
    }
    if (e >= array[j]) {
      break
    }
    array[k] = array[j]
    k = j
  }
  array[k] = e
}

// 优化的堆排序
Array.prototype.heapSortEnhance = function () {
  const array = this.slice()
  const n = array.length
  for (let i = Math.floor((n - 1) / 2); i >= 0; i--) {
    shiftDownEnhance(array, n, i)
  }
  for (let i = n - 1; i > 0; i--) {
    // swap(arr[0], arr[i])
    [array[0], array[i]] = [array[i], array[0]]
    shiftDownEnhance(array, i, 0)
  }
  return array
}
索引堆
在上面的实现的堆中,我们总是直接操作原右数组元素。这在处理基本数据或者简单类型时没有问题,但往往我们面对的数据类型并非如此。例如,我们在处理比较大的内容时如果使用对这种结构,一旦要交换的数据量非常大,交换操作本身变得非常慢;而这种问题还可以通过技术手段解决;又例如在操作系统的进程调度时,我们可能根据进程的
pid 数组构建了最大堆来表示进程的优先级,一旦我们直接交换了堆中元素的位置,我们就无法根据新的索引找到原来的进程,也就使得 pid 和进程脱离了关系;像这种情况使用索引堆就更为方便。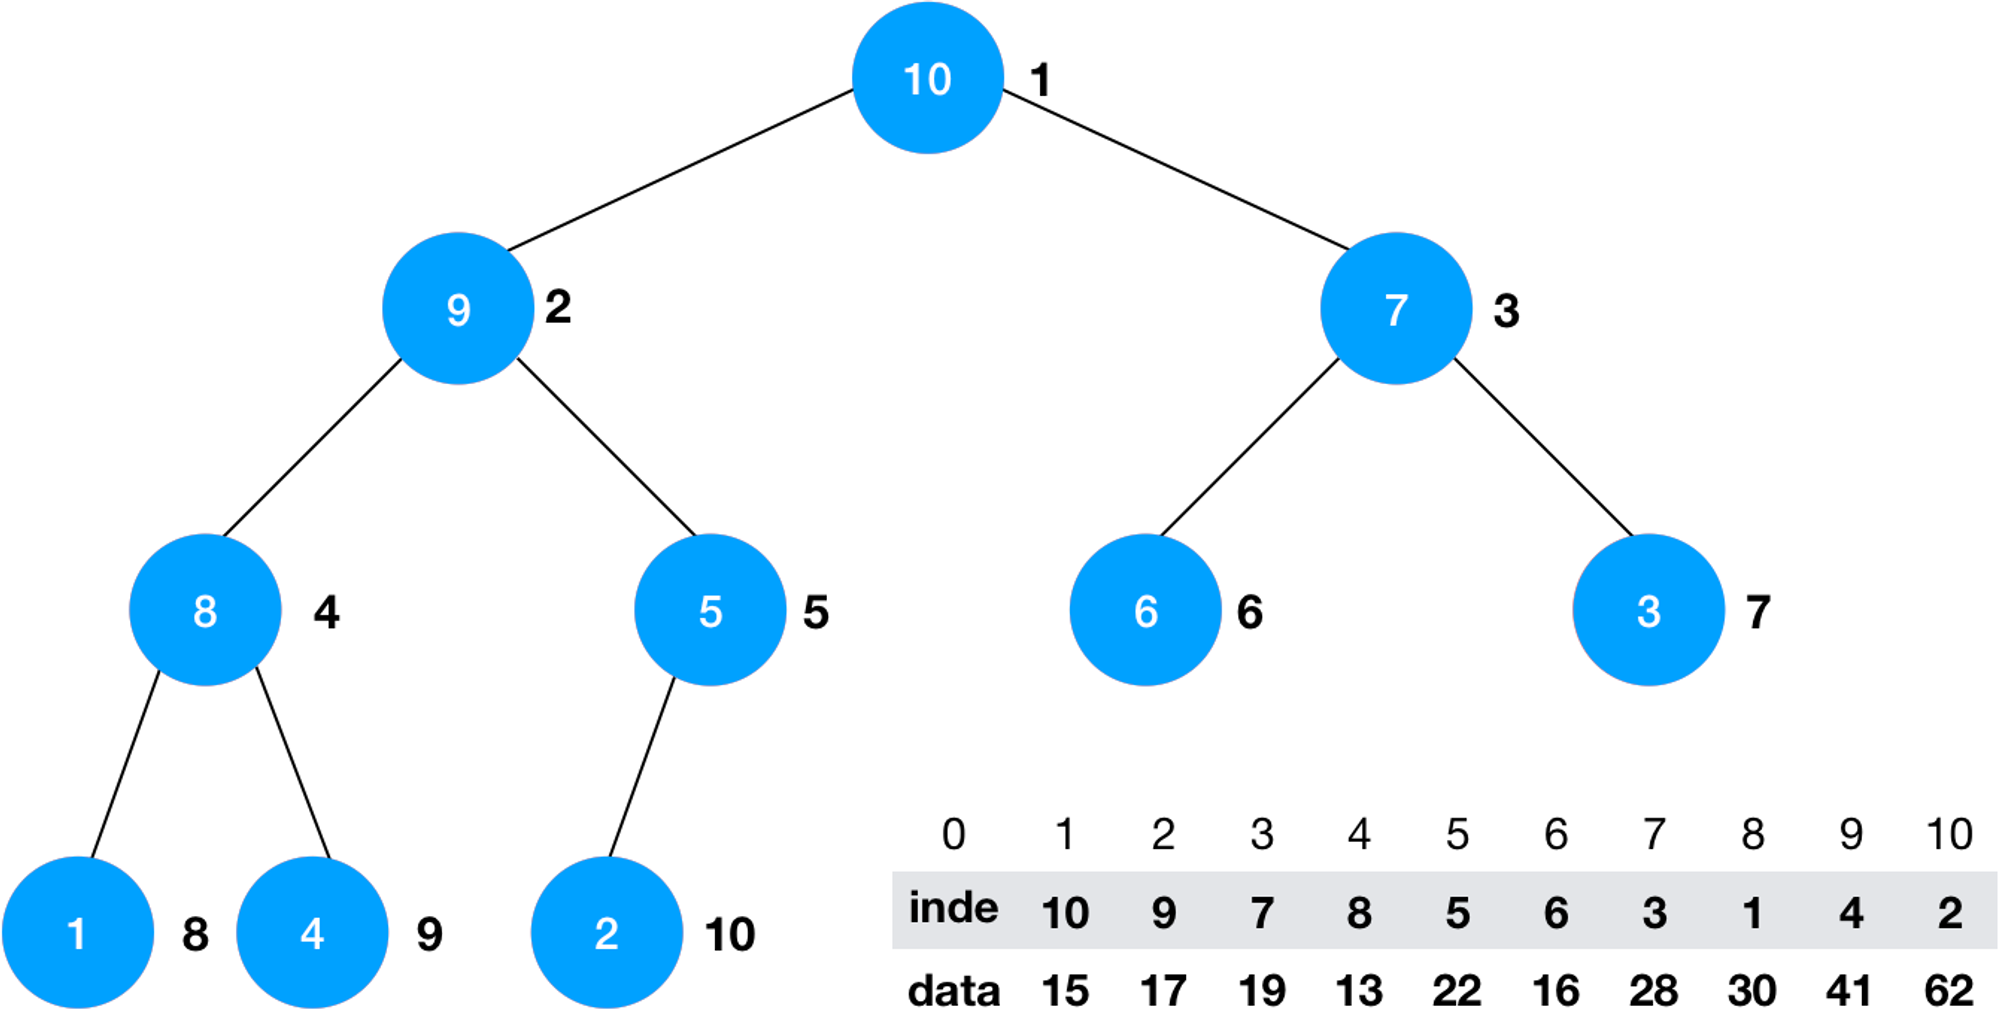
function shiftUp (data, indexes, k) {
  const e = indexes[k]
  while (k > 1 && data[indexes[Math.floor(k / 2)]] < data[e]) {
    // swap(indexes[k/2], indexes[k])
    indexes[k] = indexes[Math.floor(k / 2)]
    k = Math.floor(k /= 2)
  }
  indexes[k] = e
}

function shiftDown (data, indexes, k, count ) {
  const e = indexes[k]
  while (2 * k <= count) {
    let j = 2 * k // 此轮循环中, swap(indexes[k], indexes[j])
    if (j + 1 <= count && data[indexes[j + 1]] > data[indexes[j]]) {
      j++
    }
    if (data[e] >= data[indexes[j]]) {
      break
    }
    // swap(indexes[k], indexes[j])
    indexes[k] = indexes[j]
    k = j
  }
  indexes[k] = e
}

class IndexMaxHeap {
  // 构造函数, 构造一个空堆, 可容纳 capacity 个元素
  constructor (capacity) {
    this.#data = new Array(capacity + 1)
    this.#indexes = new Array(capacity + 1)
    this.#count = 0
    this.#capacity = capacity
  }
  size () { return this.#count }
  isEmpty () { return this.#count === 0 }
  // 获取最大索引堆中的堆顶元素
  getItem (i) { return this.#data[i + 1] }
  // 传入的 i 是从 0 开始索引的
  insert (i, item) {
    i += 1
    this.#data[this.#count + 1] = item
    this.#indexes[this.#count + 1] = i
    this.#count++
    shiftUp(this.#data, this.#indexes, this.#count)
  }
  extractMax () {
    const ret = this.#data[this.#indexes[1]]
    // swap(data[indexes[1]], data[indexes[count]])
    ;[this.#indexes[1], this.#indexes[this.#count]] = [this.#indexes[this.#count], this.#indexes[1]]
    this.#count -= 1
    shiftDown(this.#data, this.#indexes, 1, this.#count)
    return ret
  }
  extractMaxIndex () {
    const ret = this.#indexes[1] - 1
    // swap(data[indexes[1]], data[indexes[count]])
    ;[this.#indexes[1], this.#indexes[this.#count]] = [this.#indexes[this.#count], this.#indexes[1]]
    this.#count -= 1
    shiftDown(this.#data, this.#indexes, 1, this.#count)
    return ret
  }
  // 将最大索引堆中索引为 i 的元素修改为 newItem
  change (i, item) {
    i += 1
    this.#data[i] = item
    // 找到 indexes[j] = i, j 表示 data[i] 在堆中的位置
    // 之后 shiftUp(j), 再 shiftDown(j)
    for (let j = i; j <= this.size(); j++) {
      if (this.#indexes[j] === i) {
        shiftUp(this.#data, this.#indexes, j)
        shiftDown(this.#data, this.#indexes, j, this.#count)
        return
      }
    }
  }
}上面这个索引堆的类不仅实现了最基本的堆的操作,还实现了一些索引堆可以完成的特殊操作;而最重要的就是
change 操作,用户可以通过给定一个索引来方便的修改堆中某个元素的值。但可以注意到,修改完这个元素后,要使得堆继续形成最大堆,我们仍需要对新插入的元素进行 shiftUp 和 shiftDown 来维持堆的性质,而这使得修改元素的复杂度变成了 ~ ,这与堆的插入删除元素 的复杂度并不相符,我们可以尝试建立对索引的索引来优化这个过程: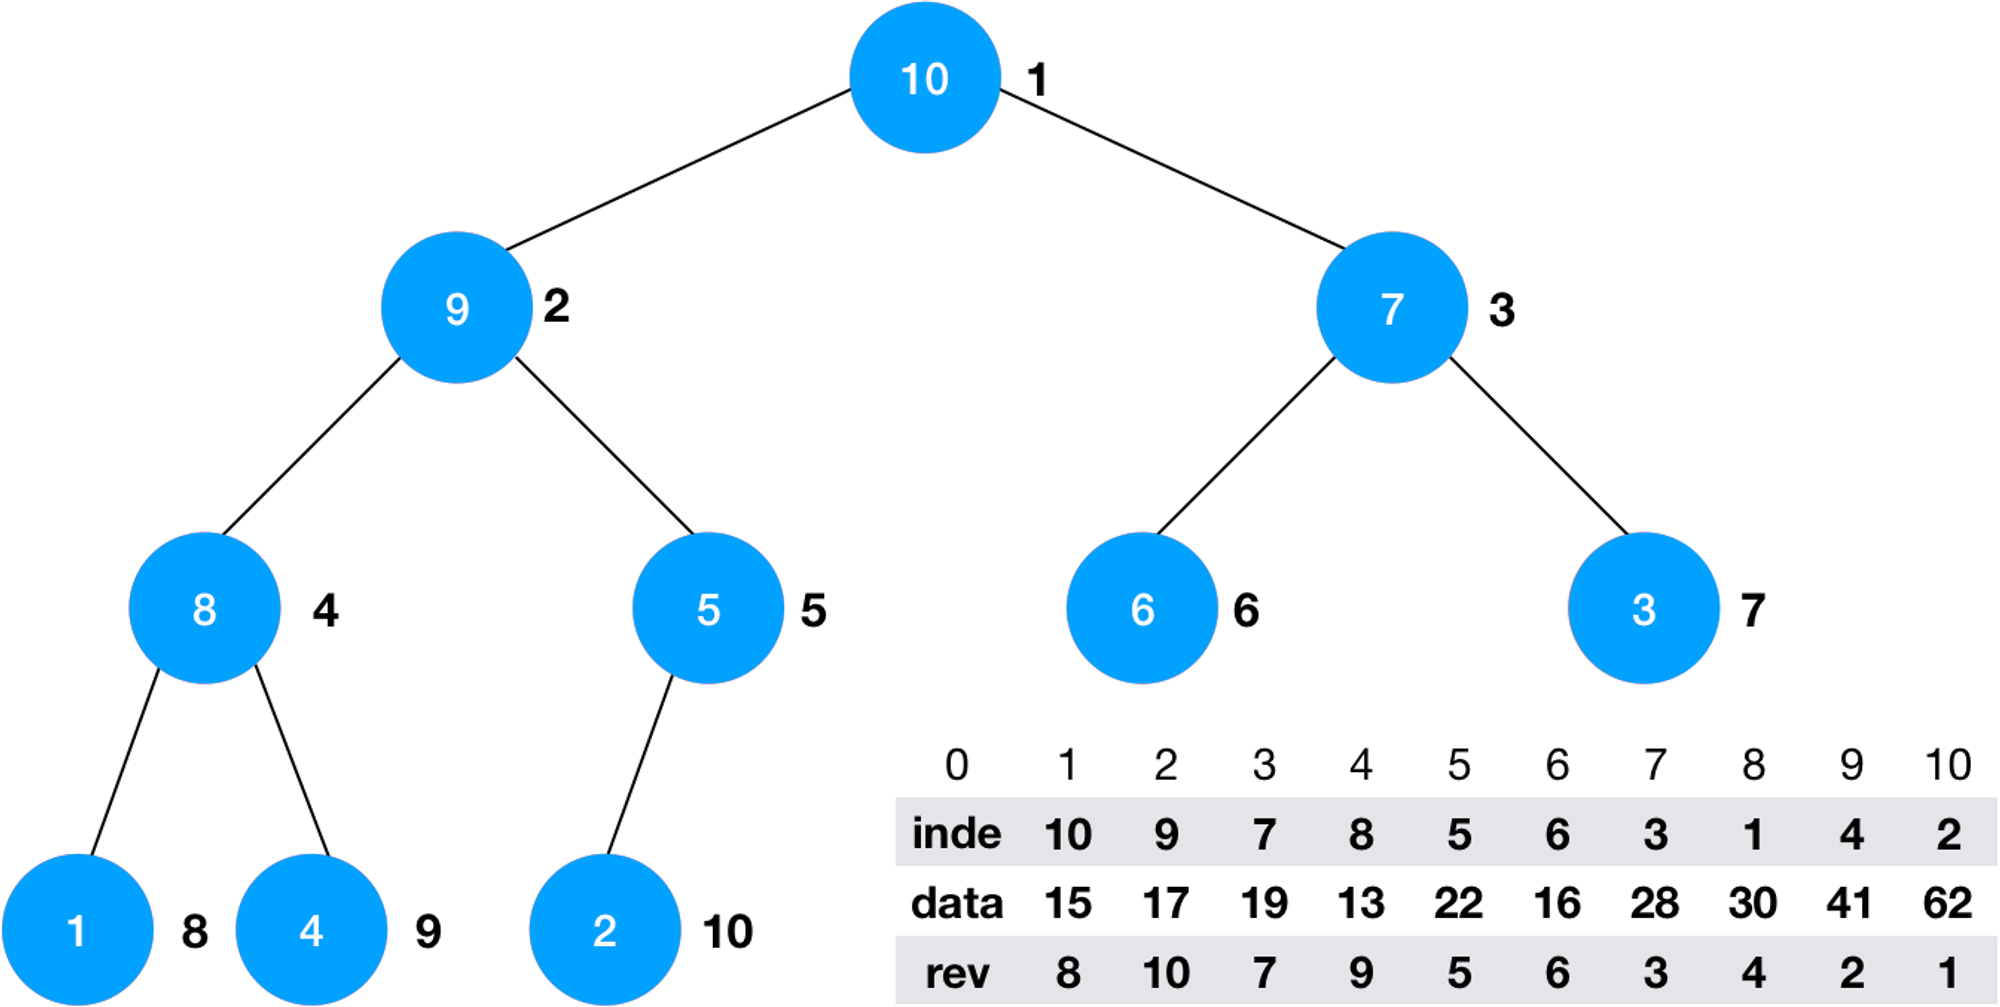
用
reverse 数组来表示 i 在 indexes(堆)中的位置:// 若
indexes[i] = j
reverse[j] = i
// 则
indexes[reverse[i]] = i
reverse[indexes[i]] = i这样,我们就可以在 内找到一个索引对应的元素:
function shiftUpEnhance (data, indexes, reverse, k) {
  const e = indexes[k]
  while (k > 1 && data[indexes[Math.floor(k / 2)]] < data[e]) {
    // swap(indexes[k/2], indexes[k])
    indexes[k] = indexes[Math.floor(k / 2)]
    reverse[indexes[Math.floor(k / 2)]] = Math.floor(k / 2)
    reverse[indexes[k]] = k
    k = Math.floor(k /= 2)
  }
  indexes[k] = e
}

function shiftDownEnhance (data, indexes, reverse, k, count) {
  const e = indexes[k]
  while (2 * k <= count) {
    let j = 2 * k // 此轮循环中, swap(indexes[k], indexes[j])
    if (j + 1 <= count && data[indexes[j + 1]] > data[indexes[j]]) {
      j++
    }
    if (data[e] >= data[indexes[j]]) {
      break
    }
    // swap(indexes[k], indexes[j])
    indexes[k] = indexes[j]
    reverse[indexes[k]] = k
    reverse[indexes[j]] = j
    k = j
  }
  indexes[k] = e
}

class IndexMaxHeap {
  // 构造函数, 构造一个空堆, 可容纳 capacity 个元素
  constructor (capacity) {
    this.#data = new Array(capacity + 1)
    this.#indexes = new Array(capacity + 1)
    this.#reverse = new Array(capacity + 1).fill(0) // 填入 0 使得默认的索引索引位置为 0 (总是无效的元素)
    this.#count = 0
    this.#capacity = capacity
  }
  ...
  // 传入的 i 是从 0 开始索引的
  insert (i, item) {
    i += 1
    this.#data[this.#count + 1] = item
    this.#indexes[this.#count + 1] = i
    this.#reverse[i] = this.#count + 1
    this.#count++
    shiftUpEnhance(this.#data, this.#indexes, this.#reverse, this.#count)
  }
  extractMax () {
    const ret = this.#data[this.#indexes[1]]
    // swap(data[indexes[1]], data[indexes[count]])
    ;[this.#indexes[1], this.#indexes[this.#count]] = [this.#indexes[this.#count], this.#indexes[1]]
    this.#reverse[this.#indexes[1]] = 1
    this.#reverse[this.#indexes[this.#count]] = 0
    this.#count -= 1
    shiftDownEnhance(this.#data, this.#indexes, this.#reverse, 1, this.#count)
    return ret
  }
  extractMaxIndex () {
    const ret = this.#indexes[1] - 1
    // swap(data[indexes[1]], data[indexes[count]])
    ;[this.#indexes[1], this.#indexes[this.#count]] = [this.#indexes[this.#count], this.#indexes[1]]
    this.#reverse[this.#indexes[1]] = 1
    this.#reverse[this.#indexes[this.#count]] = 0
    this.#count -= 1
    shiftDownEnhance(this.#data, this.#indexes, this.#reverse, 1, this.#count)
    return ret
  }
  // 将最大索引堆中索引为 i 的元素修改为 newItem
  change (i, item) {
    i += 1
    this.#data[i] = item
    // 有了 reverse 之后,
    // 我们可以非常简单的通过reverse直接定位索引i在indexes中的位置
    const j = this.#reverse[i]
    shiftUpEnhance(this.#data, this.#indexes, this.#reverse, j)
    shiftDownEnhance(this.#data, this.#indexes, this.#reverse, j, this.#count)
  }
}
排序总结
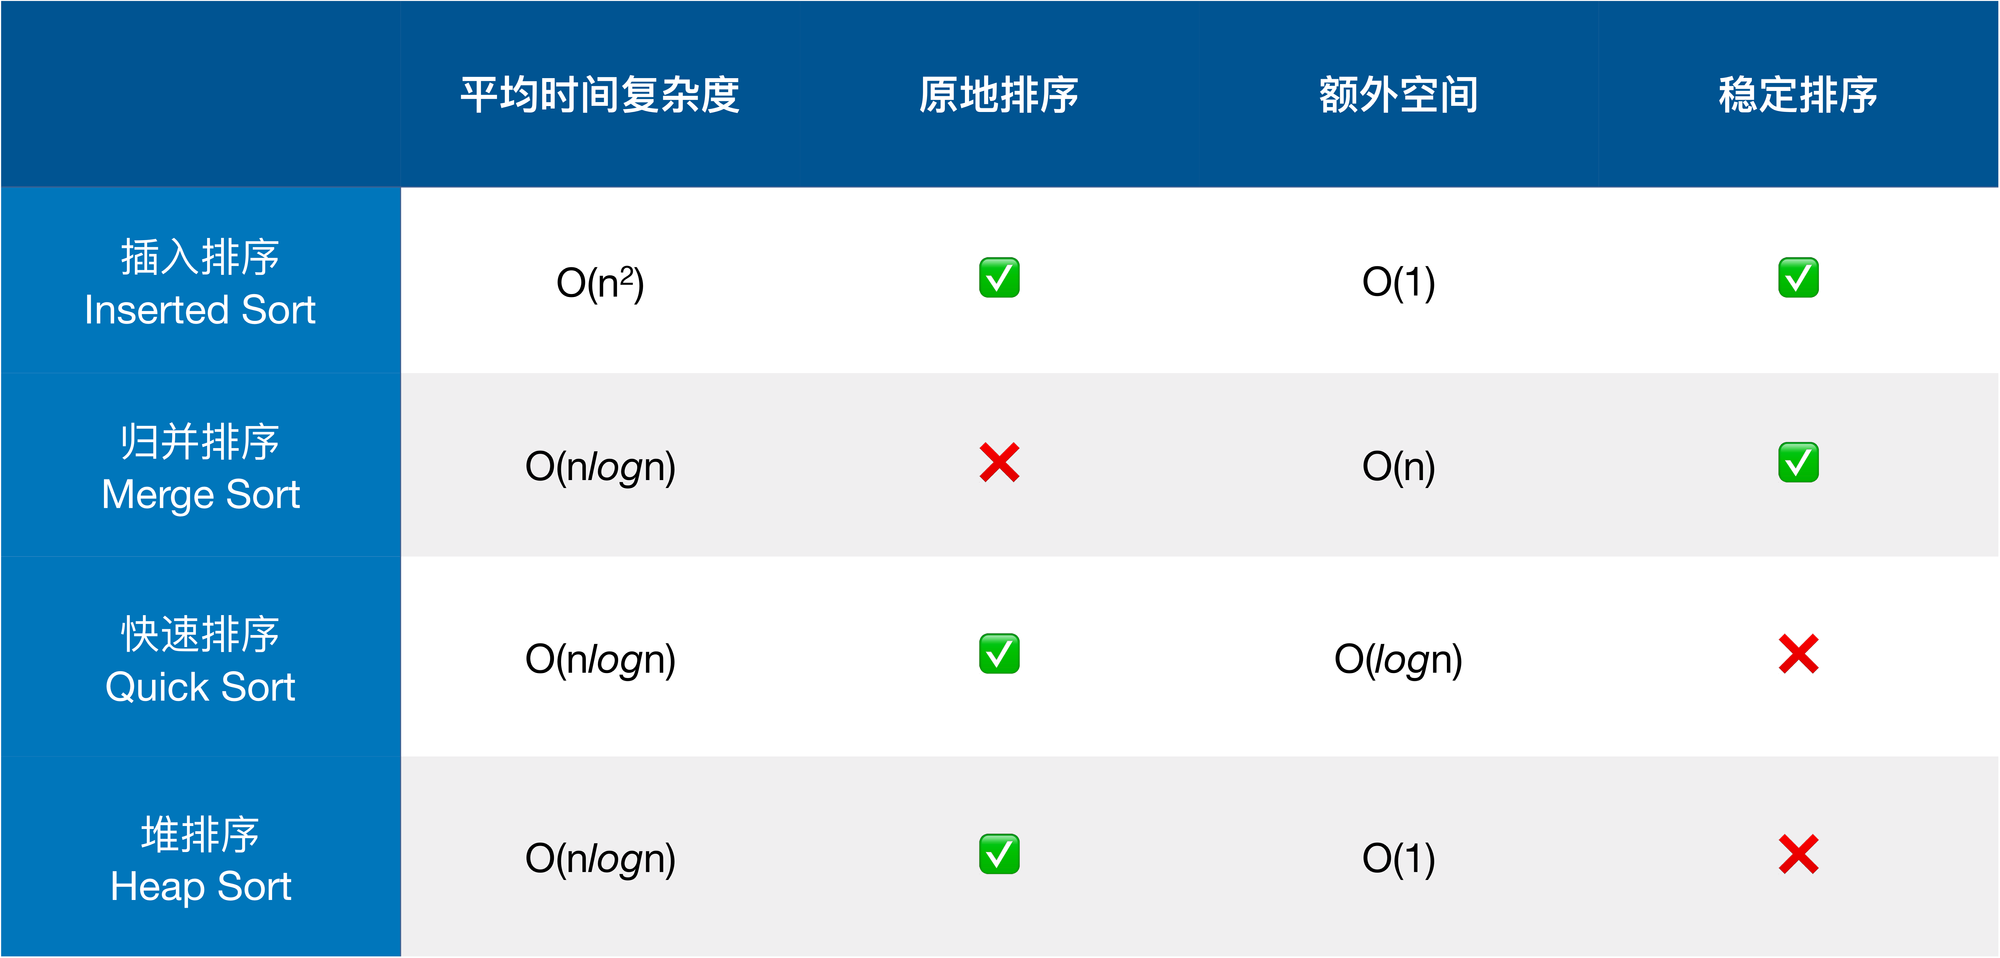
本系列的排序算法到这里就完结了。我们一共只为大家介绍了两类七种排序算法,大家也许还知道或者学习过其他更多的排序算法,这里限于篇幅就不一一为大家介绍了。
我们主要学习的就是上图四种基于比较的排序算法。除了插入排序复杂度为 以外,其余几种排序算法复杂度均为 ,但这也并不是说明插入排序不好,事实上我们在测试中可以发现在完全有序的数组上插入排序的复杂度退化为 ,甚至优于同等的高级排序算法。这说明我们在编程开发时应学会结合实际情况,选择最优的排序算法,而不是只会做一个
API caller。排序算法的稳定性
再看图中,我们看到了一个概念:稳定排序。这是指对于相等的元素,在排序前后,想等元素的相对位置没有发生改变。例如对一组学生成绩排序时,不仅要对成绩进行排序,还在在学生成绩想等时按姓名的字典序排序,很可能大部分时候原始数据都已经按姓名的字典序排好序了,但是快速排序和堆排序就有可能打乱原来的顺序。

但这并不是评价算法优劣的关键,因为我们可以通过修改排序比较的逻辑,或者干脆把比较的过程形成一个回调接口传递给用户,让用户自己完成比较的逻辑,从而使不稳定的排序变得稳定。
最优的排序算法 (?)
那么有的同学可能就想到了,会不会存在一种算法,最好它的复杂度为 或者更低,是原地排序,只需要 的额外空间,并且还能保证排序稳定?很可惜,直到今天计算机科学家也没有找到这样的算法或者说根本无法实现?。而这一块处女地或许就将由你来发掘,而这正是学习算法的魅力所在。